Tuesday, April 29, 2014

How To Reset Security Questions Of Apple id

Dear Apple Users, Welcome to TechAccessory. As you are an Apple user, you must have an apple id. And only an Apple user knows how much important apple id is? What if your apple id is gone? What if you forgot login details? Or, What if you forgot your security questions?
How To Reset Security Questions Of Apple id

It's really frustrating if any of this happens. But, if there is a problem, there is also a solution. Do you forget your security question, I am here to tell you. 

It's an easy process. So just chill! All you need to do is Follow whatever I say. I am giving you step by step instructions to reset security questions of Apple id

How To Reset Security Questions Of Apple ID:

  1. Open your browser
  2. Go to applelid.apple.com
  3. Click on Manage Your Account
  4. Then, If you forget tour ID or password, click on Forget your password
  5. Then, you have to recover your password with your rescue email
  6. Sign in your apple account
  7. Click Password and security
  8. Look under last security answer field
  9. You will find a link Send Reset Security Info to your Rescue email address
  10. Click there
  11. A mail will be send to your email address
  12. Open the email and you will find a link, click there
  13. The link will take you to Apple id page. But this time you have to login again
  14. Then choose Security questions and answer them
  15. Then click on Save
  16. That's all.
How To Reset Security Questions Of Apple id

Isn't is easy to reset security questions of Apple id? Thank you.

How to Convert Direct Download link To Torrent

Hello everyone, Welcome to TechAccessory. Do you know about torrent? Did you ever download anything with torrent? If your answers are positive, you may be thinking about downloading any kind of files with torrent client.

Many Types of download system are available in this world of internet. But two of them are much more popular. Direct download and torrent download. These two have their own advantages and disadvantages. The best thing about Torrent is the download speed.

If you wanna download all kinds of files with Torrent file, you have to convert direct download link to Torrent. It's an easy process. Now I am showing you all the best way to convert direct download link to Torrent. Please follow my instructions below:

How to Convert Direct Download link To Torrent:

  1. First, Find your download link. Copy that.
  2. Go to http://burnbit.com/
  3. You will find a box to paste Download link, paste your Download link there
  4. Then click on Burn
  5. Then the burning process will start
  6. The process may take a few minutes, actually depends on file's size and server
  7. As the process completes, You will find a button "Download Torrent"
  8. Download that.
  9. Torrent convertion is completed
  10. Open the downloaded torrent files with any of your torrent clients.

Warning:
  1. Burnbit doesn't burn any adult download link
  2. The download link must not be copyrighted

How To Recover Deleted Photos From iPhone Without Backup

Deal iPhone users, Welcome to TechAccessory. Recently, I told you That I don't believe in the word delete. Nothing can be vanished in this world of technology. Before I showed you how to recover deleted text messages from iPhone. Now I am going to show you another post about iPhone data recovery. The process is little similar to "How to recover deleted text messages from iPhone".
How To Recover Deleted Photos From IPhone Without Backup

Now, I am going to tell you how to recover deleted photos from iPhone. There are two ways to recover:

  1. Recover photos from Backup
  2. Recover photos without backup
Recover photos is an easy process just you'll have to Go to iTunes or iCloud, find your backup file and restore. But Recover photos without backup is a little tricky process. I will show you step by step:

How To Recover Deleted Photos From iPhone:

Things requires:
  1. A Mac or Windows Computer,
  2. Your iPhone
  3. Internet connection
  4. Leawo iOS data recovery
  5. USB Cable
How To Recover Deleted Photos From IPhone Without Backup

Now follow my step by step Strategy:
  1. Take all these things required close to the computer
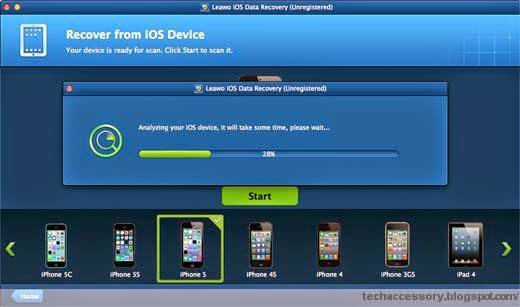
  2. Download and Install Leawo iOS data recovery. Click here for Download Link
  3. Connect iPhone to computer with USB cable
  4. The program will start scanning
  5. Then, you will find different types of iPhone data
  6. Click Camera Roll
  7. Now you will find previews of photos and videos
  8. You can tick only Deleted Files
  9. Select the photos you need to recover
  10. Next, click on Recover
  11. A popup will appear
  12. Set output location
  13. Click Go
  14. That's all

How To Backup Outlook 2010 Emails To Your Hard Drive

Dear Microsoft Outlook users, Welcome to TechAccessory. Everyone knows how much important a email is. As Outlook is one of the most popular mail platforms. Millions of people sends and receives mail everyday. So of those mails are spam and some of those are important.

If you use your outlook account for professional purposes, it' really good for you. Because Outlook let you backup your mail at your hard drive. It's a very common Features of Outlook. Do you know How To Backup Outlook 2010 Emails To Your Hard Drive?

If your answers is yes, then just ignore the post, I am sorry for killing your time. And if your answer is no, I am here to tell you step by step way to backup outlook 2010 emails to your hard drive.
How To Backup Outlook 2010 Emails To Your Hard Drive

How To Backup Outlook 2010 Emails To Your Hard Drive:

  1. Open your Outlook 2010
  2. Click on File Tab
  3. Click on Options
  4. Select Advance
  5. Choose Export To A File
  6. Click next
  7. Select File extension as .pst
  8. Choose the area you want to backup (Example: whole Mailbox)
  9. Click next
  10. Choose your destination folder
  11. A backup process will start.
It's really easy. Just follow these steps to backup outlook 2010 emails to your ahrd drive. Thank you.

Monday, April 28, 2014

How To Recover Deleted Facebook Messages

Dear Facebook Users, Welcome to TechAccessory. Delete a very common word in the world of technology. But I don't believe in this word delete. Because nothing can be deleted for good. In the past, I recovered Deleted Text Messages from iPhone and Android and shared the whole process.

I am telling you again, in this world of the Internet and technology you can't remove or you cannot lose anything. As Facebook is the biggest Social Media, Now I am going to tell you how to recover deleted Facebook Messages.

The best and worst thing about technology is you can't vanish anything from the web. Bad news for you if you tried to delete any messages from Facebook. Because I am going to tell everyone how to retrieve deleted Facebook Messages, So, Any of your past can come back. I am talking too much. Let's come to the point. I will tell the whole process step by step.

How To Recover Deleted Facebook Messages:

  1. First, log on to your Facebook account
  2. Then. Click on Message Icon
  3. After that, you have to click on SEE ALL
  4. You will find a menu "More"
  5. When you click on MORE, a dropdown menu will appear
  6. Next, you have to click on Archived
  7. You will see a list of archived messages
  8. Select the message you want to retrieve
  9. You will find a button Actions
  10. Click there, another dropdown menu will appear
  11. Click Unarchive
  12. That's all
It's a proven method for recovering any deleted Facebook message. It's really easy. Stay connected with TechAccessory for more Facebook Tips And Tricks.

How To Block Ads On Android Phone Without Root

Dear Android Users, Welcome to TechAccessory. This is the era of technology and it's also the era of Ads also. These days most of the site's have ads showing even the Android apps. In Computer we can try the Adblock extension, which is available for almost every browser. Android is a smaller device. It's really frustrating when add appears in the small screen.

There are so many apps which will make your device ad free. But this device will ask you to root your device. If you don't wanna root your device, I am here to tell you the way to block ads on android phone without root. All you need to do is follow my instructions:

How To Block Ads On Android Phone (Without Root):

  1. Download Adblock Plus. (Adblock plus is banned from Google Playstore)
  2. Install the app successfully
  3. Open the app
  4. Now you have to create a filter list. For this you have to click on Filter Subscriptions
  5. Then, Create your list
  6. Now Click on OK
  7. Done !!! This app will work on background and filter ads.
That's all. Follow these steps if you need to block ads on android phone. Thank you.

Sunday, April 27, 2014

How To Speed Up An Android Smartphone Without Rooting (Need Five Minutes Only)

Dear Android users. Welcome to TechAccessory. Very glad to say that you are using one of the best OS for Smartphones and it's the most popular OS for android as well. Your Smartphone may be a small device, but this device's power is huge and it's infinitive. Sometimes the performance becomes low because it's mini hardware.
How To Speed Up An Android Smartphone Without Rooting (Need Five Minutes Only)

Usually these Smartphones have low memory. So you have to be careful about memory to get better speed. Now, I am going to tell you some ways to speed up an Android Smartphone.

You may find so many posts about this topic. The problem is they recommend you to root your device. Rooting your device is a great idea, but some people doesn't  wanna root their device. Root is not a too easy process for every device, sometime you can loose your phone's warranty just because of rooting. If you don't wanna root your your device, read this post very carefully. Here I am going to share you the way to speed up android device without rooting.

How To Speed Up An Android Smartphone Without Rooting (Need Five Minutes Only):

Cache cleaning:

Cache is one of the reasons of slowing down android device. You may use so many apps. The Android System keeps cache from the apps. These caches kill memory. So, the first thing you need to do is clean those caches. 
We have two ways to clean caches: Manually and Automatically (Need a cache cleaner app). For manual cleaning you have to go to the Settings menu and tap on Apps. Then you have to choose app and tap again. You will find a button Clean Cache. It's a slow process. For faster processing, you have to install App Cache Cleaner. This app has auto cache cleaning features and so many features. You can set the cleaning interval also. Click here to see more about the app.

Clean caches, it'll help to speed up an Android Smartphone.

Uninstall and disable unused apps:

You may have so many apps installed. But I am sure every app is not necessary. So uninstall those unused apps. If you don't wanna use any system app disable the app. If you have any app what is important to keep but you don't need regularly. Maybe you use this app once in a month, You can do one thing. You can backup your apps. I recommend Android Assistance to backup your app.
Do this. It'll speed up an Android Smartphone.

Use a light launcher:

Some android user installs some heavy launchers like Go TSF shell, Go launcher, Buzz Launcher, Next Launcher 3D. They are awesome for beautifications but it may slow down your device. You can try some light launchers like Smart Launcher 2, Dodol launcher etc. Using a light launcher may help you to speed up an Android Smartphone.

Remove Unnecessary Widgets:

Widgets are beautiful, but they are not necessary.Usually widgets are heavy, it shows down your android's speed. To speed up an Android Smartphone one must remove those unnecessary Widgets.

Disable Auto Sync: 

This may help you to speed up an Android Smartphone. Auto Sync slows down android device while sync. You can stop Auto sync from the Setting menu.


That's all. I hope this will help you to speed up your Android Smartphones.

Thursday, April 24, 2014

How To Control Android Phone From PC

Hello Android Users, Welcome to TechAccessory. Are you one of them, who spend whole day with computer? If your Answer is yes, Then this post is only for you. What if you can use your mobile via your computer? This will be very good for you because you can send SMSs, make calls with your PC.

Do you know how to control android phone from pc? I am here to tell you. Have a look:

What you will need?
  1. Android device
  2. A computer
  3. Playstore Account
  4. Wifi connection
  5. Web browser

How To Control Android Phone From PC?

Follow my step by step instructions:
  • First, Make all required things ready
  • Unlock your Android Phone.
  • Turn on Wifi
  • Go to Playstore and Search AirDroid
  • Install AirDroid
  • Open Airdroid on your phone
  • Sign up an acoount
  • Turn on your computer
  • Open your browser
  • Go to web.airdroid.com
  • Login your account
  • A pop up confirmation will appear on your phone's screen
  • Accept that.
  • Now, control your Android phone from your web browsers
What you can control with AirDroid:
  • Send, read and type SMS
  • Make any call
  • Reject any incoming calls
  • Manage your apps
  • Manage your contacts
  • Manage ringtones
  • Manage files
  • Use phone camera as webcam
  • Take screenshot
  • and much more
That'll all. Just follow my Step by Step instructions To Control Android Phone From PC.

How To Control Your Computer From Your Android Phone

Hello TechLovers, Welcome to TechAccessory. I am very excited, because now I am going to share you an amazing post. It's about android and it's about connecting your PC.

What kind of OS are you Using? Mac or a Windows? Anything you use, This post is for everyone. It's all about How to Control your computer From your Android Phone.

Now a days everyone has Smartphone. Smartphone must be smart. Smartphones like iPhone and Android Phone are too smart because they can control your computer completely. Wanna know how? Follow my Step-by-Step instructions:

How To Control Your Computer From Your Android Phone:

Things needed:
  1. Wifi Connections
  2. Computer (Mac/ Windows vista, 7,8)
  3. Android device
  4. Playstore Account

Now I am starting the operation: 

  • Make All this thing ready which are needed
  • First, Take your Android Phone
  • Connect your Android with WiFi
  • Go to PlayStore
  • Install Remote Mouse
  • Open the app
  • Now Turn on your computer
  • Open any of your web browsers and Go to www,remotemouse.net
  • Download Remote Mouse Program for your Computer
  • As download Completes, Install the program
  • Run the Program
  • Now Change your setting from Android device
  • Then you Tap START
  • Now you can control your Computer with your Android. It works like a virtual Touchpad
How you operate:
  1. Single Tap = Left click
  2. Double tab = Right Click
  3. Two Finger Swipe Up/down = Scroll Screen Up/down
  4. Two Finger Swipe Right/left = Scroll Screen Right/left
  5. Swipe with single finger = Move your cursor
It's very easy. Try it right now because it's fun to Control Your Computer From Your Android Phone. Thank you for your valuable time.

Wednesday, April 23, 2014

How To Setup Dual Monitors on Windows 7 and on Mac

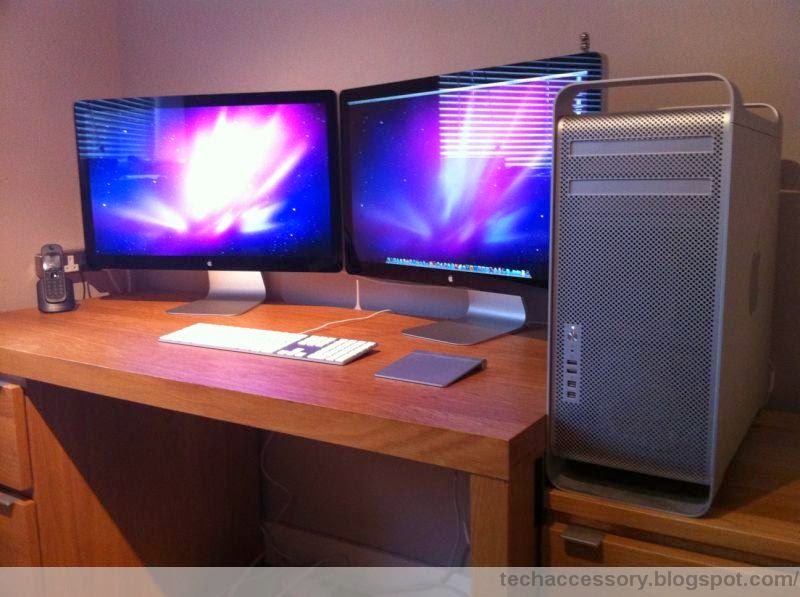
Hello everyone, Welcome to TechAccessory, Do you know it's possible to use 2 monitors for your PC? It could be an extra monitor with a laptop or extra monitor with a desktop or extra monitor with a Mac.

If you feel you have to use 2  monitors for your work, I am here to tell you how to setup dual monitor. It's an easy process. Now, I am going to show the whole process. Windows and Mac both users are welcome. First, I will give you instructions for windows 7 user:

How To Setup Dual Monitors on Windows 7: 

  1. Make sure your computer has an extra port for any additional monitor
  2. Connect the second monitor with your computer anyway, usually via VGA port
  3. If your computer doesn't have any extra port, you will need a new graphics card
  4. As the new monitor connected, you will find an option menu
  5. Here, you'll have to choose whether you want to mirror or Extend your desktop
  6. You can change the setting manually
  7. For manual Setting you have to Right Click On Desktop and then select Personalize
  8. Select Display Setting
  9. Here you can change any display setting. You can turn off 2nd monitor or make 2nd monitor as the main display or something else
  10. Now your 2nd monitor is ready to use

How To Setup Dual Monitors on Mac OS X: 

  1. Get ready to connect a 2nd monitor, Mac has the port for 2nd monitor
  2. Connect your 2nd monitor with VGA, DVI, Thumderbolt cable etc.
  3. As the display plugged in, you will have to choose between Mirror/ extending your desktop
  4. If you don't find the option, open System preferences
  5. Select Display
  6. Click on Detect Display
  7. Now you can change settings manually.
  8. Finally, your Mac is connected to a 2nd monitor
Thank you for your time. If you face any problem while setting up Dual monitor , let me know.

How To Connect PS3 Controller To PC

Hello Gamers, Welcome to TechAccessory. Do you feel comfortable playing games with mouse and keyboard? I think you love to play with PS3 Controller. Do you know how to connect PS3 controller to your PC?
How To Connect PS3 Controller To PC

It's not just plugging in, you have to do some more work. You will need to install drivers and configure that. Now I am going to tell you the whole process. All you need to do is follow my step by step instruction.

How To Connect PS3 Controller To PC?

  • Open your browser
  • First, you have to download MotionInJoy. Click here For the download link
  • Download the Software with the latest version and considering your current version of windows (such as windows 7 32 bit, windows  64 bit etc.)
  • Install the program successfully
  • Before you hit the finish button mark Run DS3 tool on the final screen of the installation process 
    How To Connect PS3 Controller To PC
  • Connect your Controller with your PC
  • Open your MotionInJoy program
  • Click Driver Manager
  • Then the program will recognize the PS3 controller
  • Place a checkmark to USB port
  • Click on Load Driver
  • Select Install this driver anyway
  • Wait till the process completes
  • Now, Click on profiles tab
  • Select PlayStaion 3 and click Enable button
  • The configuration process is completed 
    How To Connect PS3 Controller To PC
  • Now click on Vibration Testing
  • It will vibrate to make sure your PS3 Controller is Successfully connected.
That's all. It's very easy, anyone can do this. If you face any problem while doing this, please contact us or comment here.

Tuesday, April 22, 2014

How To Install iOS 7 On iPhone Without a Developer Account

Hello, iPhone users, Welcome to TechAceessory. Do you know iOS7 released? Are you looking for using this latest version?

Do you have developer account? If you don't, you have 2 options: Buy developer account @ 100$ or Install iOS7 without UDID (developer account). Wanna know how?


Just you have to follow my steps. It's easy. Things that you will need are:

  • A Mac computer / windows PC
  • Internet Connection
  • USB cable
  • Supported device: iPhone 4. iPhone 4S, iPhone 5,iPod and iPad etc. 

Step By Step Instructions To Install iOS 7 On iPhone Without A Developer Account:

  • Get all the things required
  • Download the latest official version of iOS. It could be iOS 6.1.4
  • Now Download iOS7.
  • Connect your device with your USB cable
  • Backup your iPhone data on iTunes.
  • Make sure iTunes backup completed
  • Hit left click and Alt together (MAC)/ Hit left click and shift together on the button check for updates
  • Then select iOS7 (you downloaded earlier)
  • Wait till updates completes
  • Allow all automated processes.
  • As it finishes, You get your iOS 7
It's easy, isn't it? Try iOS 7, It's awesome and you will feel the joy of using iOS7. Thank you.

How To Activate A Verizon Phone (3 Different ways)

Hello readers, Welcome to TechAccessory. Now, I am going to share a very important post. Now-a-days Cell phone has a bigger role play in our life. That's why you have to think about your phone's security. What if you lost your cell phone, or what if you start using a used cell phone?

If you face any of these, you have to do some important task. This is not only to maintain the rules, but also for your security reasons. You must activate your verizon phone.

How To Activate A Verizon Phone? 

It's really a very easy process. All you need to do is follow my steps. I'll tell you three different ways to activate a verizon phone:

1. Activate with your phone only:

  • Take your Cell Phone
  • Remove the back cover and your cell phone's battery
  • You will be able to see the SIM card slot
  • Insert your SIM Card
  • Replace your phone's back cover and battery
  • Turn on your phone
  • Dial *228
  • Your phone will make a call
  • Then, select Option: 1
  • Enter your ten digit number with area code
  • Then enter your 4 digit security number
  • Your phone may reboot twice or more, allow all those automated process
  • Wait for 15 minutes

2. Activate via online with existing plan:

  • Go to www.verizonwireless.com
  • Login with your account information
  • Click My Verizon tab
  • Select Activate or Switch device
  • Fill the information the system ask you to give
  • Follow their instruction
  • Your phone may reset twice or more
  • You will the confirmation info on your phone's screen

3. Activate via online with existing plan:

  • Open your browser
  • Go to verizon wireless device page (http://www.verizonwireless.com/b2c/nso/enterDeviceId.do)
  • Input your device IP adderss
  • Verizon will confirm if your phone compatible
  • Then, if your cellphone is compatible, it will activate automatically.
Thank you.

Monday, April 21, 2014

How To Change Default Browser Mac OS X

Hello guys, welcome to TechAccessory. This post is specially for mac users. Do you wanna change your default browser? Do you need when you click on any link it will open in your desired browser? if your answer is yes, you have to change your default browser. For this, you have to do some easy works. Now I will tell you how. Have a look:
How To Change Default Browser Mac OS X

How To Change Default Browser Mac OS X:

I will tell you two different ways for doing this operation.

Method #1:

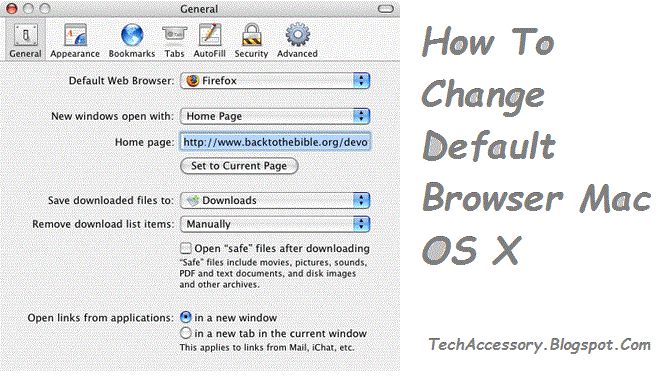
  • Open your Default Safari browser
  • Then click on safari on top, you will find a dropdown menu
  • Select Preferences
  • Next, Click on General tab
  • Click on default web browser
  • A popup menu will appear
  • You will find a list of installed browsers
  • Select your desired browser
  • Then click on Apply

Method #2:

  • Open the browser which you wanna make default
  • Go to setting menu
  • Check the tabs/ advance setting
  • You will find Set default browser button
  • Save the setting
  • Done
Follow the instructions, It's easy. Thank you.

How To Recover Deleted Files After Emptying Recycle Bin on Windows 7

Dear visitor, Welcome to TechAccessory. Deleting is not enough to vanish one file. One can easily restore deleted files from Recycle bin. What if you Empty your Recycle bin? Is the files vanished forever? Is there any way to get the files deleted from recycle bin? If you have these questions in your mind, Listen to me very very carefully. I am going to tell you the way for recovering that deleted file. It's not so easy or not so tough. All you need to do is follow my instructions.

How To Recover Deleted Files on Windows 7 After Emptying Recycle Bin? 

I will show you two different ways to do that. Read both and choose the one you prefer most. Have a look:

How To Recover Deleted Files Windows on 7 After Emptying Recycle Bin From Control Panel:

  • First Go to start menu
  • Select Control Panel
  • Find Performance and Maintenance and select that
  • Click on backup your data
  • Click next
  • Choose Restore Files and setting,
  • Click on next again
  • Now select your folder locations when Items to restore list appears
  • Click on finish. Then the system will do everything. If there is no big error/ damage you will find your file as the process completes

How To Recover Deleted Files Windows on 7 After Emptying Recycle Bin Using a program:

  • Don't make any change in the folder
  • Now, Find a File Restoration program
  • Buy the selected File Restoration program from the store or download from the internet
  • Some programs may cost money
  • Install the program on your computer
  • Then, follow their instructions.
  • You will get instructions step by step while doing the operation.
Hope you find what you were looking for.

Top 50 High PR (Pagerank 5+) Video submission Sites List 2014

Hello SEO guys and Website Owners, Welcome to TechAccessory. Everyone knows that Google is strict these days. It's tough getting huge visitor with just quality contents. You will need Website Marketing also. The problem is everyone is doing SEO. Are you feeling the pressure? You have to be smarter that others to overcome. There are so many ways for website marketing. Everyone is doing Social bookmarking, forum posting, web 2.0, directory submissions etc. These were very effective and still they are. But to overcome in this huge competition, you have to do more like Document sharing, video submission etc. Before I gave you the lists of 2014's top Social Bookmarking, Directory submission, Document Sharing sites, it's time for Top 50 High PR Video submission Sites List 2014. These days, everyone has the ability to watch videos online. That's why people prefer Videos than reading Press release and long articles. Let's Check the list:

Top 50 High PR Video submission Sites List 2014:

        PR 9 Video submission Sites List:

  1. http://www.youtube.com/
  2. http://www.vimeo.com/
  3. http://www.flickr.com/

    PR 8 Video submission Sites List:

  4. http://youku.com/
  5. http://archive.org/
  6. http://sapo.pt/
  7. http://myspace.com/
  8. http://blip.tv/
  9. http://www.ustream.tv/

    PR 7 Video submission Sites List:

  10. http://video.google.com/
  11. http://hulu.com/
  12. http://photobucket.com/
  13. http://funnyordie.com/
  14. http://dailymotion.com/
  15. http://metacafe.com/
  16. http://brainpop.com/
  17. http://video.yahoo.com/
  18. http://dailymotion.com/en
  19. http://viddler.com/
  20. http://www.tubetorial.com/
  21. http://www.teachertube.com/
  22. http://www.collegehumor.com/
  23. http://screen.yahoo.com/

    PR 6 Video submission Sites List:

  24. http://videojug.com/
  25. http://trooptube.tv/
  26. http://break.com/
  27. http://buzznet.com/
  28. http://stupidvideos.com/
  29. http://4shared.com/
  30. http://mevio.com/
  31. http://aniboom.com/
  32. http://veoh.com/
  33. http://blinkx.com/
  34. http://expotv.com/
  35. http://crackle.com/
  36. http://qik.com/
  37. http://twitvid.com/
  38. http://shutterfly.com/
  39. http://www.godtube.com/
  40. http://www.liveleak.com/
  41. http://www.engagemedia.org/

    PR 5 Video submission Sites List:

  42. http://sciencestage.com/
  43. http://mefeedia.com/
  44. http://stickam.com/
  45. http://esnips.com/
  46. http://ebaumsworld.com/
  47. http://rayzz.net/
  48. http://vidly.com/
  49. http://blogtv.com/
  50. http://dropshots.com/

That's all. Try these sites. Create videos and upload in these sites. This will definately boost your site's trafic.

Sunday, April 20, 2014

Top 50 High PR Document Sharing Sites

Hello, everyone, Welcome to TechAccessory. Today I am going to share a very important post. It's SEO related. This post is specially for SEO workers and Webmaster. Everyone knows these days, It's really tough getting huge traffic. You have to do so many things. Everyone does Social bookmarking, Directory Submissions, Forum Posting and all other basic SEO works. You have to be very smart to overtake their work. Have you ever heard about Document sharing? Document sharing is a new way to bring more traffic. It's a easy process, but the result is very effective. All you need to do is create a PDF document file and share them to the top high pr document sharing sites. One more thing, make sure you have linked your site in the PDF's content smartly. It will help you to find more visitors. You should not promote your site in low PR sites, because it can be harmful. Now I am going to share Top 50 High PR Document Sharing Sites, which will help you to reach your goal.

Top 50 High PR Document Sharing Sites:

1.     scribd.com

2.     docstoc.com
3.     slideshare.net
4.     slidesix.com
5.     issuu.com
6.     en.calameo.com
7.     4shared.com
8.     wepapers.com
9.     authorstream.com

I hope these links will help you.  To get other SEO Tips and List for promoting SEO sites, click here. Thank you.

Wednesday, April 16, 2014

How To Convert avi to mp4 On Mac For Free Without Loosing Quality

Welcome to TechAccessory. Mp4 is the most popular and highly used video format. As everyone has Smartphones and Tab these days, the importance of keeping mp4 media files rises. Everyone watches videos and movies on Smartphone and  tabs. Mp4 is the best format for this type of devices. What if you have avi media file and you want them in your iPhone or iPad?
Now, I am going to tell what you should do. The best way is converting those avi files to mp4. Are you thinking about the quality? Don't worry. I am going to share the way to convert avi to mp4 on mac for free without loosing quality. Here we go:

How To Convert avi to mp4 On Mac For Free Without Loosing Quality:

Things required:
  1. A Mac computer
  2. Video Converter
  3. AVI files

Convert avi to mp4 On Mac with iSkysoft

  • Get your iSkysoft
  • Run the program
  • Now, click on add files
  • Set mp4 as your output media file
  • Now, click to convert
  • Then, convert process will start
  • Wait till it completes
  • Finally, you find your desired mp4 videos

Convert avi to mp4 On Mac with Tune4Mac video converter:

  • Download your Tune4Mac video converter
  • Install that on your Mac
  • Run The program
  • Now Click add file
  • Select the files you need to convert
  • Now, select mpeg4 as your output media formats
  • Click convert button to start
  • Then, Tune4mac will start converting
  • As the process completes, you get your file in MP4 format

Convert avi to mp4 On Mac online:

  • Go to any avi to mp4 converter site
  • Upload your media files
  • Then click convert/start etc
  • As the process completes, you will find the Download button
  • Download that
  • This downloaded file is your desired mp4 file
I hope I told you the best ways to convert avi to mp4. Try anyone. It's really easy. Thank you.

    How To Convert JPG To PDF On Mac

    Welcome to TechAccessory. Are you a Mac user? Are looking for something which will help you to convert your single or multiple image files to a pdf file? If your answer is yes, I am here to help you. It's easy, but, little tricky process. Now, let me tell you the way of converting JPG to PDF:


    How To Convert JPG To PDF On Mac:

    • Open Automator
    • Select Workflow
    • Select your files from the left column, then Drag to Right hand column
    • Go to search field
    • Type preview
    • Find New PDF image
    • Drag that to the right column
    • Then, Click on the Add button
    • Now type a output file name
    • Click run
    • Wait until the process completes
    • That's all
    You can also try online JPG to PDF converter sites:
    All you need to do is follow my instructions, It's easy and I will not kill a huge time. Thank you for reading my article.